Created By
Matt Adams
Updated On
- February 29, 2024
Get FREE Exclusive Access
Keep your lawn pristine with exclusive tips, offers and insights that I only share with my private subscribers.
Latest Posts
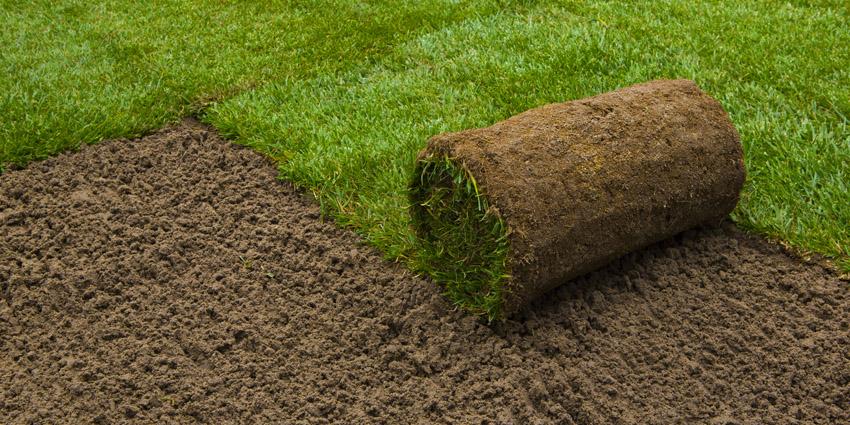
Preparing the ground & soil for turf
- By Matt Adams
- February 29, 2024
Jump to
Get FREE Exclusive Access
Keep your lawn pristine with exclusive tips, offers and insights that I only share with my private subscribers.
Whether you’re preparing the ground for turf or seed, the process is largely the same. The main difference is that you have slightly more leeway on the levelling when using turf because it already has a layer of soil itself (but turf is miles more expensive so it’s the least I would expect when paying so much).
On another note, if you’ve read my other lawn care articles, you’ll know that I’m massively in favour of seed over turf.
Anyhow. If you’ve made your decision and you’re gonna be laying turf, you still need to prepare the ground. That’s where this article comes in.
I’m giving you the step-by step process to create the best possible soil bed for not only laying turf but also making sure it stands the test of time. Of course, you’ll still need to keep up your yearly lawn programme if you want the new grass to remain in top shape.
Step 1 – Remove the old lawn
Depending on your starting point, this may or may not be relevant to you. One thing I didn’t know when I did my very first renovation is that you can hire what’s called a ‘Turf Cutter’. This machine will take the very top of the ‘grass’ off and leave you with the soil underneath. I did mine with a spade and my hands (which of course is the cheaper option) – yes, it was RELENTLESS!
So, I highly recommend hiring a turf cutter if you have old crappy grass and a large area to cover where you want to put your new turf.
Now you have it down to soil it’s time to get the soil into good shape.
Here’s how.
Step 2 – Clear any plants, weeds and debris
Make sure you’ve cleared as many weeds and rubble as possible. That way they are less likely to return when you wait for your new turf to establish itself in the old soil.
By now there shouldn’t be any plants left as they will have been removed when you took the old lawn off. If there was no lawn to remove and you’re just clearing the way. Be sure to get rid of ALL plants.
You may want to move or repurpose some plants to another part of the garden. If you do, then be sure to put them in a place where they will thrive.
Finally, make sure ALL debris or concrete is taken up and repurposed or disposed of sensibly. This can be back breaking work but it’s definitely worth it. If you don’t clear concrete from the bed of the lawn you will have a 90% chance of creating a really poor drainage system, which means moss will thrive during the cold and wet Winter months. By the following Spring, you’re lawn will look ‘meh’.
Step 3 – Test the PH Level of the soil
Lots of people skip this step and I understand it seems a bit OTT.
But, it’s dead easy to do and you can easily get hold of a PH tester from your local garden centre of even online. Don’t skip it because it will guide you for the next steps (keep reading).
Grass thrives in soil that has a PH level of 7 (neutral) or as close to 7 as possible. That means not too acidic and not too alkaline. If you find your soil is either side of neutral, there are things you can do to modify it.
Step 4 – Add topsoil, compost and/or a PH Modifier
This is a crucial step if you want your lawn to look great for the long term.
Some sites suggest using 4-6 inches of topsoil along with a layer of organic matter, especially if you have a sandy base.
When you’ve added the topsoil, it’s time to rotavate the new soil and organic matter into the old soil.
If you found your soil was acidic when testing the pH, now is the time to add a modifier. Modifiers come in the form of lime as a non-organic option or calcified seaweed as an organic choice.
Once you’ve added the modifier, recheck the pH. Go easy on the modifier, it’s much easier to add more than take some out.
Step 5 – Level & rotavate the soil
The next step is to get your rotavator out (also known as a tiller). You can hire these if you don’t have one yourself, but they’re not expensive and come in handy in all parts of the garden.
Go over the whole area. and rotavate it to about 15cm deep. Rotavating before levelling will give you some fresh, fluffy soil that is much easier to move, level and manage as you move to the next stages of soil preparation.
After rotavating and before doing anything in terms of flattening, you may want to shift some soil from one part of the ground to the other – just to make it more of an even playing surface. I did this when I created my lawn and – yes it was back breaking work – but I never regretted it. It was so easy to mow too.
Try to reduce the gradient of slopes where possible. That way it will be easier to both cut and water the lawn when it’s established.
It also saves on cost because you are simply moving soil from one part of the garden to the other, rather than buying more.
Step 6 – Roll & flatten the soil
Once you’re happy with the overall evenness of the surface, it’s time to get your pernickety head on. Because now you need to make the surface as flat as possible.
Fair do’s though, with turf you do have a bit of give because there’s already soil attached to the bottom. A strong incentive for choosing turf.
That said, you should definitely try to get the ground as flat as possible. The first step is to roll over the soil with a heavy drum roller. I’ve got one of those dead heavy metal ones but these days you can pick up water butt rollers for pretty cheap.
You could use a soil compacting machine if you really want to get it perfect.
Step 7 – Wait 2-3 weeks then kill off weeds
Now the patience needs to kick in a little. It’s hard! Especially if you’re the type of person who wants something now.
Anyway here’s where you’ll wait about 3 weeks. By then, any active weeds that have been covered with soil, will start to rear their ugly heads.
Now is a good time to spot kill those weeds with a strong weed killer. That way, you can be sure the lawn has a better chance of outdoing the weeds.
If you don’t want to use a weed killer, then you could remove any large weeds by hand. Just make sure to pull their roots out fully. One benefit of NOT using a weed killer means you can crack on with the next step straight away.
If you want some ideas for killing weeds without a weed killer, have a read of this article.
Step 8 – Wait a further 3-4 weeks and apply pre-turf fertiliser
To give your turf a massive boost, you need to apply a layer of TRG’s Pre Turf Fertiliser.
This is a crucial step if you want your lawn to be the best it can be, as soon as possible.
Note: If you applied weed killer as mentioned in the previous step, you need to wait another 3-4 weeks before applying pre turf seed fertiliser.
The idea of pre turf fertiliser is that it contains a high percentage of Phosphate. This is the macro nutrient needed for the lawns roots to grow strong. By giving your new turf extra Phosphate, you will help the roots to establish themselves within the ground much quicker.
On another note, if you change your mind and decide to seed instead, pre seed/turf fertiliser has been known to reduce the germination time by half.
Step 9 – Lay your turf (or sow your seed)
This article doesn’t tell you how to lay turf. But once you’ve done the above tasks you’re now ready for the final step. The one you’ve been waiting for. It’s time to get your beautiful lawn laid.
A few things to think about include how you will edge your lawn and how you will continue to care for your lawn once it’s been laid.
Remember the lawn care and feeding doesn’t stop here. If you want to keep your lawn green, lush and dense, have a read of my other article called – How do I take care of my lawn year round | Monthly guide
This Post Has One Comment
Hi, very good advice about starting a new lawn. I built a new lawn 2years ago after moving house and inherited a 260sq.mt. pure moss and weed disaster. Had to remove every bit of it to a depth of about 10 inches. Used a tiller to smash it all up then pick out by hand all weeds,moss,roots,stones,wire,plastic etc. added loamy top soil ,tilled it in,raked it flat, stomped it in raked again made flat, added granular fertiliser to boost the seed growth then used metal lawn rake to lightly mix in the grass seed. Rolled the entire patch to help seed make proper contact and watered with fine spray every morning and evening, result was a stunning level thick lawn. Last years summer drought was a major problem because my soil is very sandy and really could not tolerate it even though I watered up to three times a day and could not afford the time and cost of the watering, the result this year is a lawn that is ugly, weeds all over the place, unbelievably bumpy, mini bare patches everywhere and loads of weed grasses taking over, absolutely b****y heartbreaking. Anyway I can’t put up with this so I’m going to use a turf cutter to rip off the top then till and weed it, add a bit more top quality soil and start again. I think this is the most cost effective method, Any suggestions? Regards Phil