Created By
Matt Adams
Updated On
- February 29, 2024
Get FREE Exclusive Access
Keep your lawn pristine with exclusive tips, offers and insights that I only share with my private subscribers.
Latest Posts
Spring Lawn Renovation for Shade & Wet Areas – Step by Step
- By Matt Adams
- February 29, 2024
Jump to
Get FREE Exclusive Access
Keep your lawn pristine with exclusive tips, offers and insights that I only share with my private subscribers.
So, you’ve laid new turf or even sown seed. You created a lush lawn last year, the Winter’s come and gone and we’re heading into the new, warm season.
BUT!
Your beautiful lawn is now either:
- Full of Moss,
- Bare in poatches
- Doesn’t look good
- And maybe even a few weeds have crept in.
Or ALL OF THE AOVE.
Don’t worry, I’ve been there myself. And this post will take you through step-by-step, how to sort it out.
If you just want the steps, here they are in summar
- Apply our soluble moss killer at 4g per m2 (link here)
- Apply weed killer that doesn’t kill lawns (we don’t sell)
- Rake out the dead moss and weeds + Aerate with hollow tines
- Optionally overseed with our Premium Shade Grass Seed (link here)
- Optionally apply top dressing of sand/soil 70/30 at 2kg per m2 (we don’t sell)
- Wait 6 weeks, then Feed with our Luxury Spring & Summer Lawn Feed (link here)
- Wait 10 weeks then feed with our Premium Autumn Feed
- wait 10 weeks then feed with our Specialist Winter Feed + Moss Suppressant
It’s Time for a Spring Lawn Renovation
Doing a Spring renovation can take time. Some waiting time and some grafting time.
But, it can also be hugely rewarding. Your lawn will come out looking fine and beautiful.
While working in the garden, you can take yourself away from the stresses of every day life. That’s why I ALWAYS recommend to ‘do it in your own time’.
Anyway, the steps below will tell you EXACTLY what to take your lawn from ZERO TO HERO in the minimum possible time.
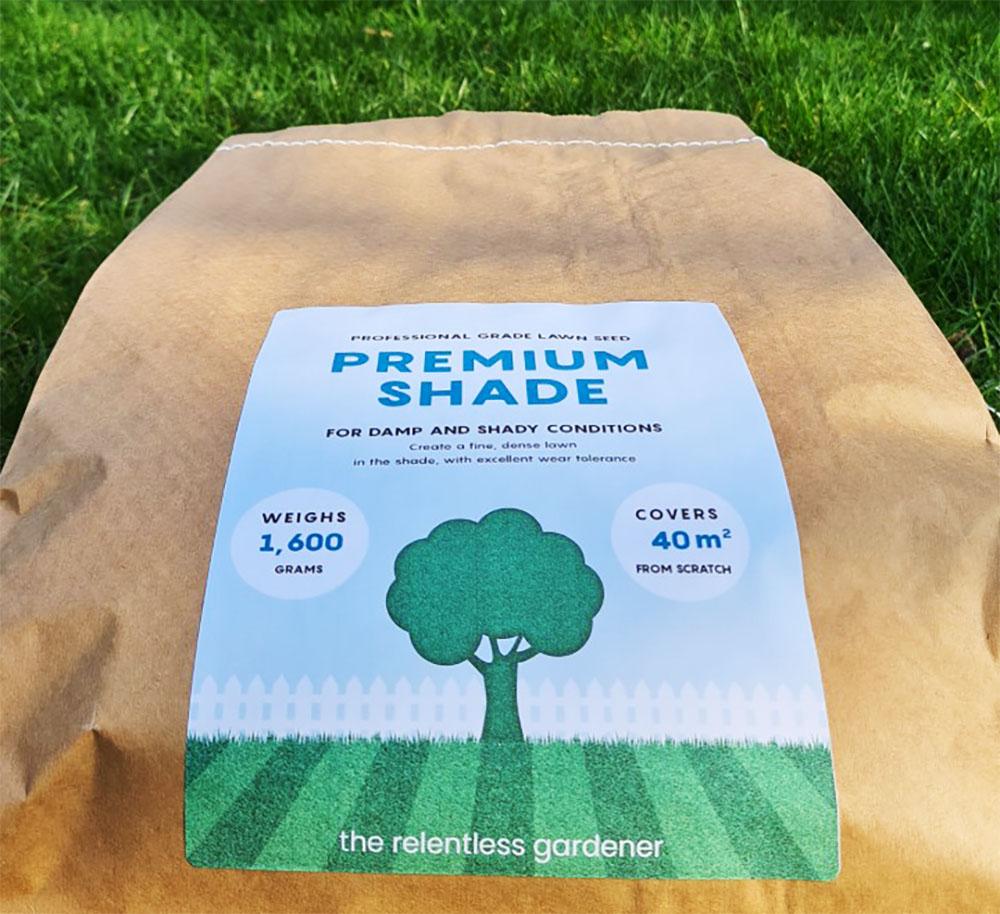
Note, when you get to the overseeding step, if your grass is in the shade, you’ll want a grass seed mix that has been specially formulated for shady and wet areas.
Step 1 – Apply moss killer first to get rid of the moss
Ferrous sulphate of Iron, AKA Iron Sulphate, AKA Moss Killer is BY FAR the best and quickest way to remove moss from the lawn. It;’s a soluble powder that turns moss black within hours, ready for you to rake it out.
Mix 4g per m2 with water and sprinkle it on the lawn using either a knapsack sprayer or a watering can. Have a read of my article to find out which might be the best sprayer for your lawn
Step 2 – (Optionally) Apply Weed, Feed & Moss Killer Granules
If you don’t suffer from weeds, you definitely shouldn’t do this stage.
Why?
Applying a weed and feed product will DELAY EVERYTHING.
That’s because you’ll need to wait a minimum of 6 weeks before overseeding (see more below). The longer you have to wait for overseeding, the longer it will take for a lusher lawn.
If you do suffer from weeds, a fast acting weed and feed can be hugely beneficial to the grass already there while it works hard to eliminate the weeds.
Remember though, it is a herbicide so if you’re looking to achieve an organic gardening method, then you’ll want to look at removing the weeds another way.
Remember this too. If you keep the grass strong after your renovation, the weeds will definitely be kept at bay and you won’t need weed and feed ever again.
Step 2a – Wait 6 weeks after applying weed and feed
This is hugely important! If you do apply a weed and feed (all-in-one) product, then you’ll need to wait a minimum of 6 weeks. That’s because the chemicals in the granules can prevent any grass seed from germinating.
Meaning you would just waste money on seed and won’t achieve the desired results of a lush green sward.
Step 3 – Rake/Scarify out the dead moss
Make this the job you do before anything mentioned below.
Why? Because it will open up the area for any seed or feed, which you apply to better reach the soil.
If your lawn is more than 50m2, then I highly recommend investing in an electric scarifier. This will remove the moss and even the under-thatch within 10 minutes.
The hardest part?
Getting rid of all the dead mass that gets pulled up. Just collect it and recycle it in your gardening bin.
If your lawn is smaller than 50m2, then simply use a manual rake. Put a bit of elbow grease in to pull up as much thatch as possible.
Oh and if you do invest in an electric one, you’ll definitely use it in the future so it’s not a buy once and never use again type of toy. Scarifying (posh word for raking) is done at least every year and some pros suggest to do it monthly in Spring.
Step 4 – Apply a pre seed fertiliser
Pre Seed or pre turf fertiliser will help grass seed germinate faster. It will also give the soil, the much needed nutrients to give the grass plant a good start.
If your grass isn’t too bare or patchy, then you may decide to skip the pre seed, but apply a Spring fertiliser instead. The big difference is that a Spring fert will give the current healthy grass a BOOST. Pre-fert won’t.
Step 3 – Apply Grass Seed at an Overseeding rate
When overseeding your lawn, you don’t need to do a full application rate – ultimately saving you a bit of doh. Great!
You can apply our premium shade grass seed at approximately 25g/m2 instead of 40g/m2 and you will be sure to thicken up the area.
Make sure you follow the guidelines when applying an overseed.
But the most imporrtant thing?
Make sure the temperature is above 8 degrees Celcius for a sustained period after sowing seed. When the days have warmed up but the mornings are still moist, it’s a perfect time to sow.
Step 4 – Optionally add a layer of compost to improve seed to soil contact
This is definitely optional and will be dependant on time, budget or desire to create a perfectly level patch.
If you do decide to apply a top dressing, use 1-2KG per m2. There’s a few options to choose from including 70/30 sand/soil mix, compost, or standard top soil or even just sand.
Weigh it out and drop it down in piles around the lawn, then using a lawn leveller, simply push the dressing around the surface. If you don’t have a lawn leveller, you can use a wide brush with medium-soft bristles.
While you’re brushing it around the surface, any holes should get filled up and the area should be more level than it was before.
- Top dressing in Spring will improve drainage.
- Top dressing in Spring will improve soil composition
- Top dressing in Spring will reduce moss
Ultimately, Top dressing in Spring will give your grass a super strong chance of fighting the elements during the harsh months
Step 5 – Wait 2 weeks, then apply a liquid feed or liquid seaweed
Liquid feed will keep your lawn vitalised during the hot Summer months.
It sounds funny. But in the Summer, your grass is under huge stress, trying to stay green. Not go brown. So, helping it through that will pay dividends.
What about liquid seaweed? If you’re all about organic, this is for you. The benefits? Liquid Seaweed will massively increase the bio-diversity of the soil. Soil biodiversity makes the growing conditions infinitely better.
What’s more, you only need 1ml, YES 1ml per m2 of grass. So it’s well worth it.
– Move into your yearly lawn care programme
Doing this will give you WAY LESS work next year. I know. It seems ages away. But trust me, if you take a small amount of time to apply feed in the Summer, Autumn AND Winter, your lawn will look SOOO much better when it gets to the following Spring.
So, reward your hard work in Spring by feeding the law each season.
This Post Has 2 Comments
I am just starting out on my lawn care journey,as I have moved into a house with a bigger lawn. I look forward to putting into practice the lawn tips that you are posting.
Good stuff David, feel free to get in touch if you have any questions. Cheers, Matt